How to Tokenize Sensitive Data using Spark UDFs
- Jun 10, 2025
- 3 min read
Did you know that you can tokenize PII data to your existing pipelines without overhauling your architecture or adding proxy agents? With SecureToken, it is possible to apply native tokenization functions as part of your workflow. Simply call a simple UDF, and you’re instantly protecting sensitive data in-flight, instead of treating security as a separate post-processing gap.

Why Tokenize Data in Your Pipeline?
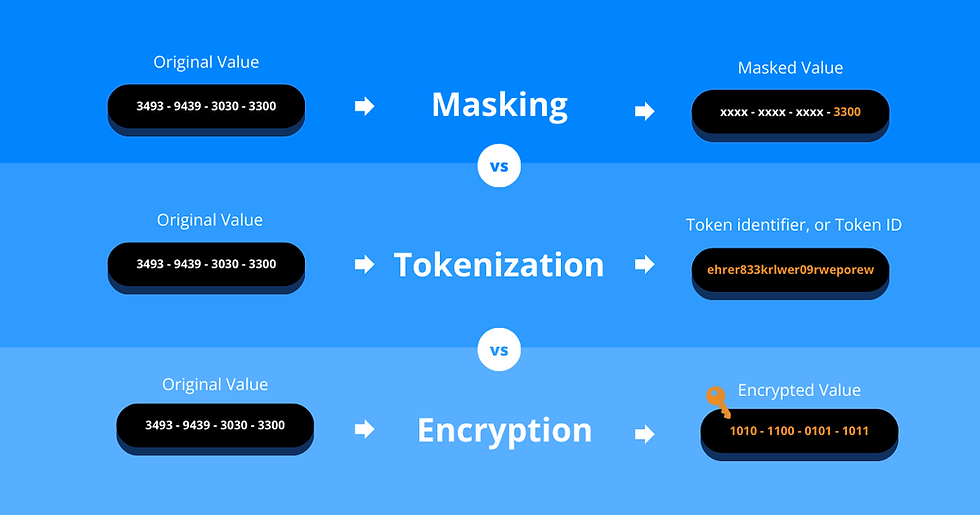
As more organisations transition analytics, machine learning, and GenAI training into production, the importance of protecting sensitive data in-flight has become critical. Tokenization replaces sensitive values—like credit card number, phone number, or email addresses—with secure, non-sensitive equivalents, known as tokens. These tokens preserve the format and structure of the original data but can’t be linked back to individuals.
Using tokenization in the pipeline allows you to protect your data as it is being processed, rather than applying protection only at rest or after the fact. This centralizes sensitive data protection within data pipeline, so your governance can enforce privacy policies at a single point. It also satisfies compliance with DORA’s dual encryption standards by keeping raw PII out of downstream systems.
SecureToken makes this possible with minimal setup. You don’t need to change how your pipeline is built—just call the UDF with the appropriate parameters, and the tokenized data is returned inline as part of your job.
What is a User Data Function?
A User Data Function is a custom function that can be invoked inside a data pipeline to perform reusable logic such as data transformation, validation, or in this case, tokenization. In SecureToken, UDFs are used to apply tokenization or de-tokenization to specific pieces of data based on predefined rules or templates.
These plug-and-play tokenization functions are deployed directly in your computing environment and run where your data lives. Because UDFs integrate into your existing pipeline logic, they’re ideal when your architecture team does not want to disrupt or alter current data flows much.
Using Tokenization in your Data Pipeline via User Data Functions
This section walks through how to apply tokenization using a Spark UDF in your pipeline. While Bluemetrix SecureToken also supports Hive and Impala UDFs option exist, we’ll focus on Spark.
Step 1: Sign up for SecureToken Access
To get started, sign up for access to the Bluemetrix SecureToken Wrapper. Once approved, head over to the AMP Cloudera Landing Page to follow the setup instructions. You’ll be guided through:
Creating a session
Completing Cloduera ML configuration
Launching a Jupyter notebook environment

Note that a 30-day free trial is available if you want to test Bluemetrix SecureToken before rolling it out across your production workflows.
Step 2: Tokenize Data using Spark UDFs
Once your Jupyter environment is ready, the next step is to tokenize sensitive data by following these steps:
Import the SecureToken Python wrapper
Create a sample DataFrame with PII
Initialize the tokenization client with Ranger KMS
Tokenize sensitive columns using built-in methods
# Create your Spark Session and Import SecureToken Python wrapper
from tokenization_wrapper import FpeKms Instance

# Create a Sample DataFrame
df = spark.createDataFrame([
    ("Alice Stark", "alice@example.com", "0881234567"),
    ("Bob Dylan", "bob@company.com", "0881112223")
], ["name", "email", "phone_number"])

# Initialize SecureToken with Ranger KMS
tokenizer = FpeKmsInstance('kms_key_name', 'kms://https@myrangerkms.server.com:9494/kms')

# Tokenize sensitive columns
tokenized_df = df.tokenize_name("name").tokenize_email("email").tokenize_ph("phone_number")
tokenized_df.show()
Noted that SecureToken integrates tightly with Apache Ranger and Key Management System. If you’ve defined policies around who can access what, those policies are automatically enforced at runtime across both on-prem and cloud environments.
Step 3: View Tokenized Output and Enforced Access Controls
After tokenization is applied, here’s what the data looks like before and after:

This dataset includes real names, email addresses, and phone numbers—plaintext values that could easily expose personal information if mishandled.

In the tokenized version, sensitive fields have been replaced with format-preserving, non-sensitive values. While the original names, emails, and phone numbers is no longer visible, the tokenized data retains the structure and types needed for downstream operations, which ensures your pipeline logic, joins, and analytics continue to function without interruption.
At the same time, access to de-tokenized data is strictly controlled. SecureToken works with policies defined in Apache Ranger and enforced through KMS, so that only authorized users can view or reverse tokenized value. Everyone else sees only protected tokens.
You’re all set! You’ve now learned how to use SecureToken with Spark UDFs to tokenize sensitive data inside your pipeline.
Next steps
Check out our whitepaper to learn more about how SecureToken works with Cloudera or start your 30-day free trial and see how tokenization fits into your Data workflows.